Got Milk? Building a Smart Fridge Weight Scale
Wouldn’t it be nice to know how much milk you have left in the fridge while you are out shopping? The ‘smart’ fridges might be on their way to the market, but they are not cheap. We started testing the feasibility of a small module that can be added in a ‘dumb’ fridge and this is what we have learned.
Components
In this blog post we detail how we came to the final setup below and what we have learned from building this project.
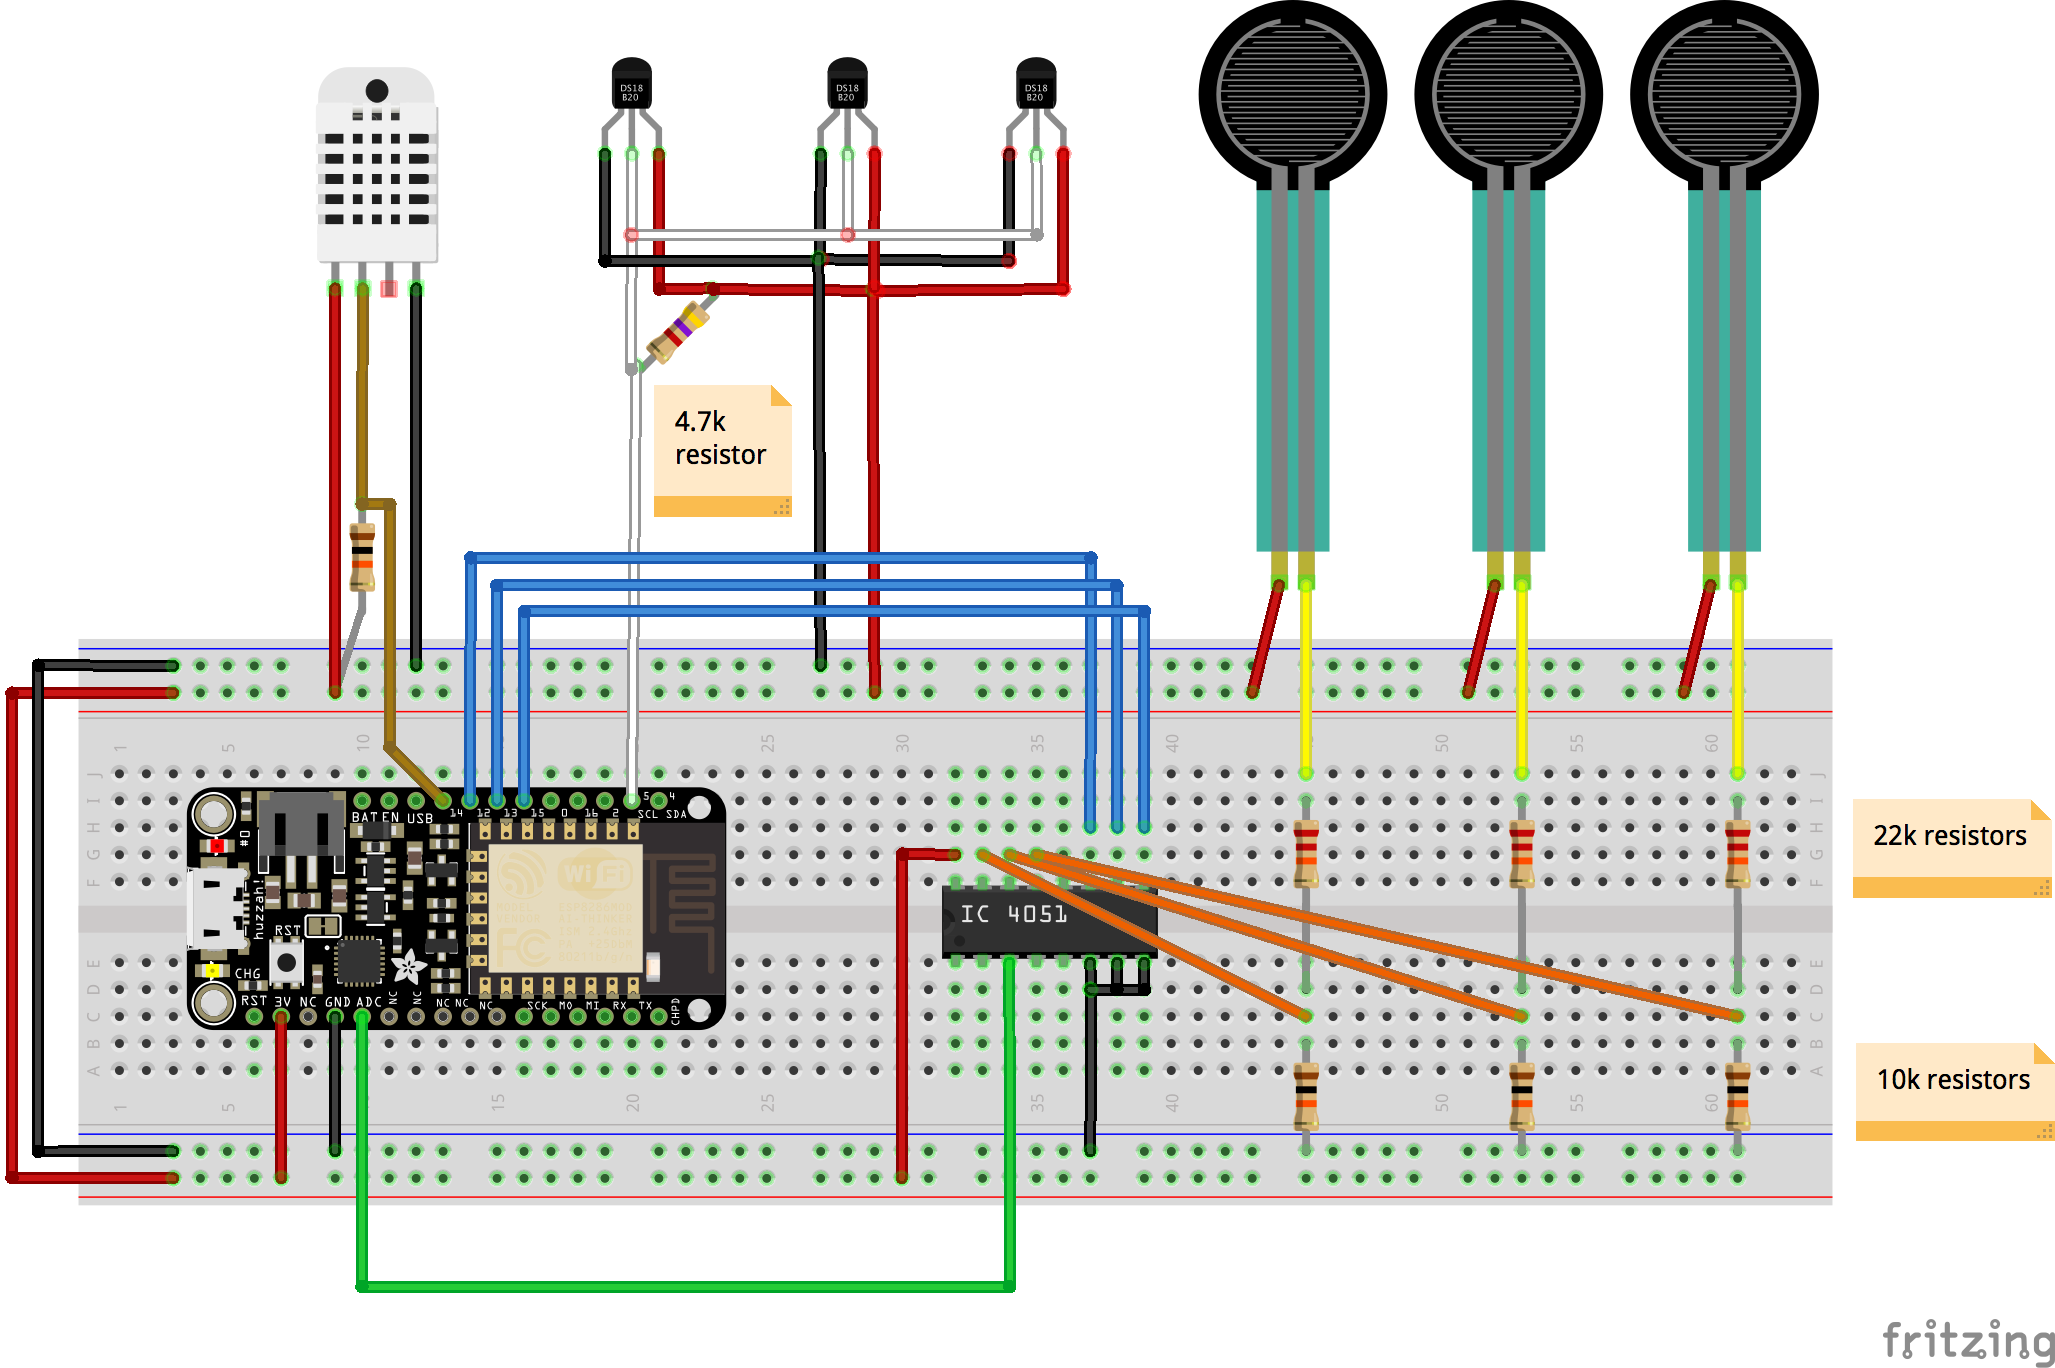
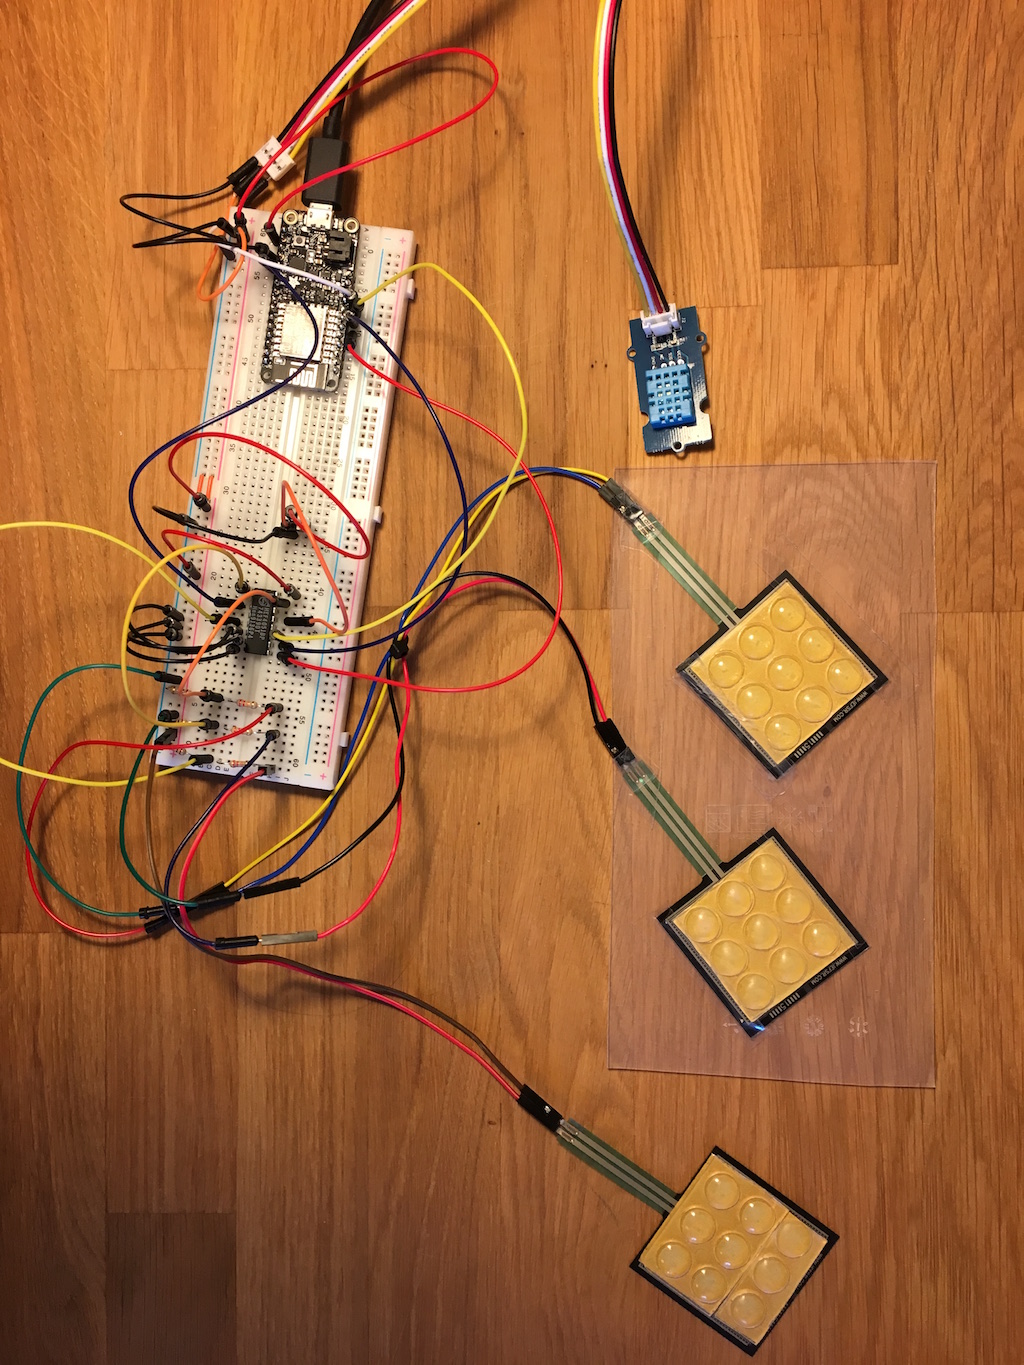
We included pressure sensors to detect the milk cartons and temperature sensors to read the temperature inside the fridge.
The total cost of building the scale with 3 pressure sensors (excluding the temperature sensors) was around 50$. Here’s the bill of materials (BOM):
| Item | Est. Price | Description |
|---|---|---|
| 1 x Adafruit Feather HUZZAH with ESP8266 WiFi | 15.95$ | Pretty small development board with built-in WiFi and smarts from Adafruit. |
| 3 x FSR | 3 x 7.95$ | The Square Force Sensitive Resistors can be bought from Adafruit. |
| 1 x CD4051 | 1.6$ | The 4051 is an 8 channel analog multiplexer / demultiplexer that enables you to expand the inputs and outputs on your Huzzah board. For the setup of the pins check this article. We bought ours from our local electronics shop for 1.6$ |
| 1 x Power supply | ~5$ | The Huzzah can be powered using a micro USB cable. Alternatively, can use a Lithium Ion Polymer Battery. |
| Perfboard, wires, resistors and headers | ~1$ | A bunch of wires to connect the components, a perfboard to solder the components on, and resistors of different values to test with. If you dont want to solder the Huzzah to the project, you may want to use some headers that you solder on the perfboard and then just fit the Huzzah in it. |
| Foam and various materials | ~0-3$ | The foam is needed in order to better distribute the pressure over the FSRs. Price depends on the design and you might get away with reusing materials you have around the house. |
| Optional: DHT22 | 9.95$ | Can buy the DHT22 from Adafruit if you want to add temperature and humidity to the project. |
| Optional: DS18B20 | 3 x 4.25$ | If you want to add temperature sensors to the project, we recommend using the digital ones. Can be bought for example from SparkFun Electronics or maybe your local electronics store. For the setup of the pins check this document. |
Our code for the project is available on GitHub.
A bit of background
We want to see if we can solve the eternal question of whether we already have milk in the fridge, how much and whether we need to buy more.
Of course, the most important function of a fridge is to keep its contents at a cool temperature. Whatever changes we make to it, these must not affect its main feature.
Knowing if there is milk in the fridge could potentially result in (1) less milk being spoiled (by buying only the quantity the milk that is needed) and (2) saved time and less frustration (that is usually associated with having to go back to the shop).
We did not find any ready-to-buy products on the market and therefore found the challenge quite interesting.
Timeline of building a prototype for a Wi-Fi connected 'milk scale'
We started working on a prototype back in May 2016 and kept a change log with the progress on the project. Here it goes:
- 30-MAY: Used FSR sensors with an Arduino to measure weight of a milk carton; ordered a few more sensors so we can measure all the cartons on the fridge door shelf.
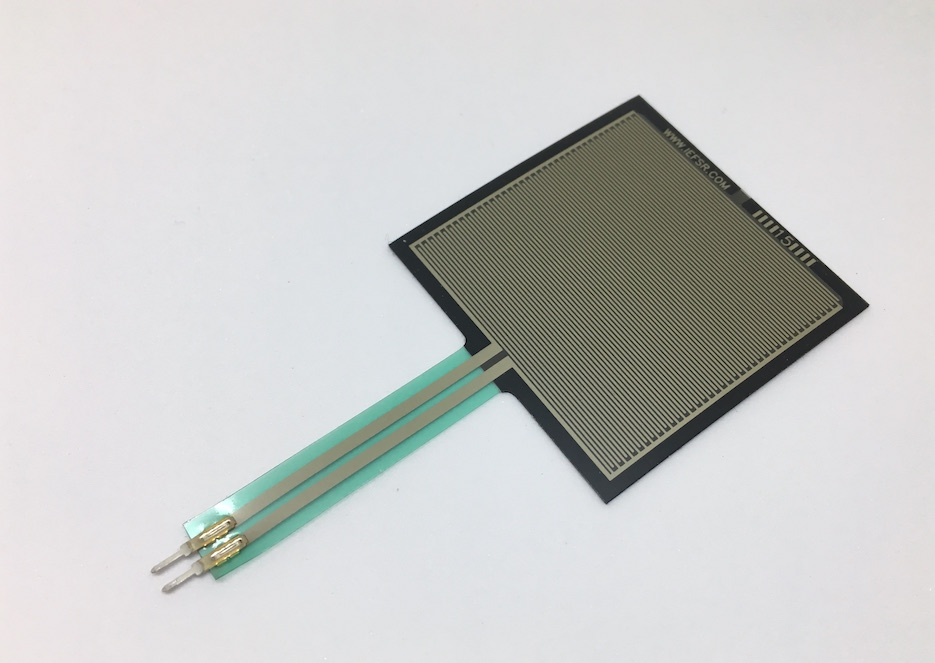
We started using an FSR (force sensing resistor) for measuring weight even though we knew that these are not able to measure precisely. We knew that the alternative would be load cells, however, the FSR looked much easier to get started with, and had a nice thin profile which we thought would be more suited for the project.
- 3-JUN: Arduino now uses two FSR sensors to measure weight of 2 milk cartons; looking for what materials could be used for the project, currently using a plastic sheet cut out from a plastic box.

The surface of the FSR sensor is smaller than the milk carton, which means that when we put the milk on the FSR the milk carton leaned outside the margins of the FSR, which means that it would ‘cheat’ with the weight. We improvised by putting some small square pads on top of the FSR which would raise the height of the sensing area so that the entire weights of the milk carton would fall on the sensor.
- 4-JUN: Added temperature sensor on Arduino in addition to the 2 weight sensors.
In parallel with building the milk scale we were also working on adding some temperature sensors to the module. The temperature sensor can be used for example to identify whether the fridge door is left open so that a notification is being sent, but in the end, as you will see, we got a bit carried away and added more than one temperature sensors in the idea of validating that the temperature inside the fridge is different between shelves.
- 25-JUL: Feather Huzzah ESP8266 with 4051 MUX reading temperature and from 2 FSRs, but sensitivity is not so good from FSR (can only detect that there is something on or not, but not how much).
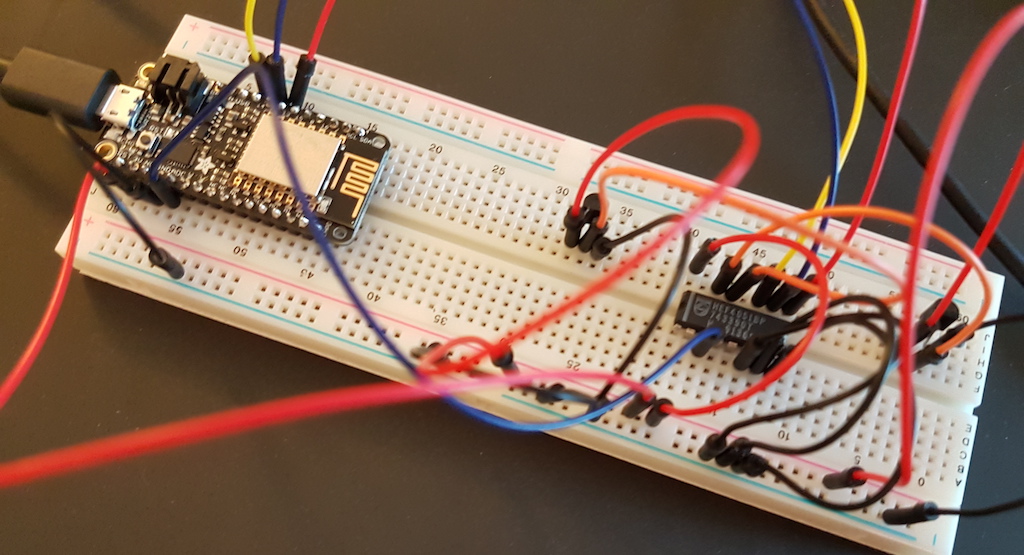
The Feather Huzzah is a small development board with built-in Wi-Fi, which is why we chose it for this IoT prototype. However, the FSRs are analog and the Feather Huzzah only has 1 analog pin, which means that if we want to use several analog sensors with one Huzzah we need a multiplexer. We used the 4051 MUX.
-
27-JUL: Feather Huzzah ESP8266 with 4051 MUX, TMP36, 2 FSRs, added Wi-Fi and server to check values from browser when Huzzah is not connected to computer.
-
29-JUL: Still having issues with getting more precise measurements from the FSRs, we can only know whether the milk is there or not, but not about how much. Also, looking for inspiration for case design for the milk scale.
Check out our Pinterest board with inspiration for the milk scale: Smart Milk Scale Design.
- 30-JUL: Measuring with the multimeter on the FSR we get more sensitive values which show that we could kind of estimate if there is no milk, some milk, or enough milk. Debating whether to use load cell sensors instead, which give more accurate measurements - these are used in weight scales - thinking also of buying a kitchen scale and looking inside. Did some testing using different resistors to scale the voltage and with different milk cartons (empty, full, full minus one glass of milk), and found some resistors that give us good values. Started drawing some basic design of the sensors, cables and how it will placed in the fridge.
- 01-AUG: Shopping for materials that could be used as cushioning on the FSRs.
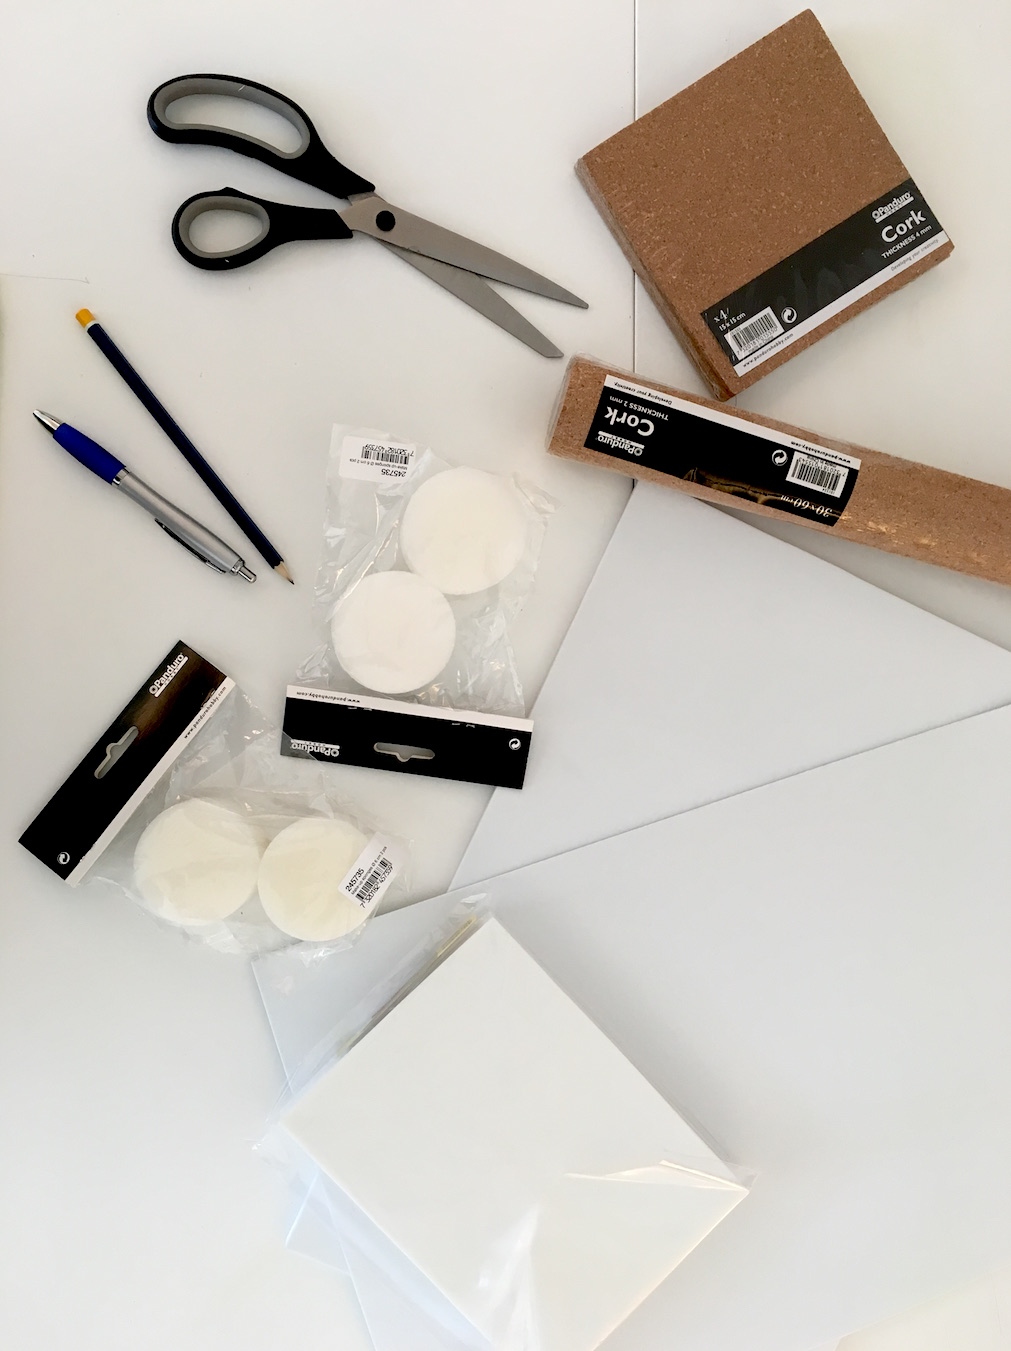
We learned (ref) that we need something soft on top of the FSR, so we bought various materials such as foam, neoprene, and cork.
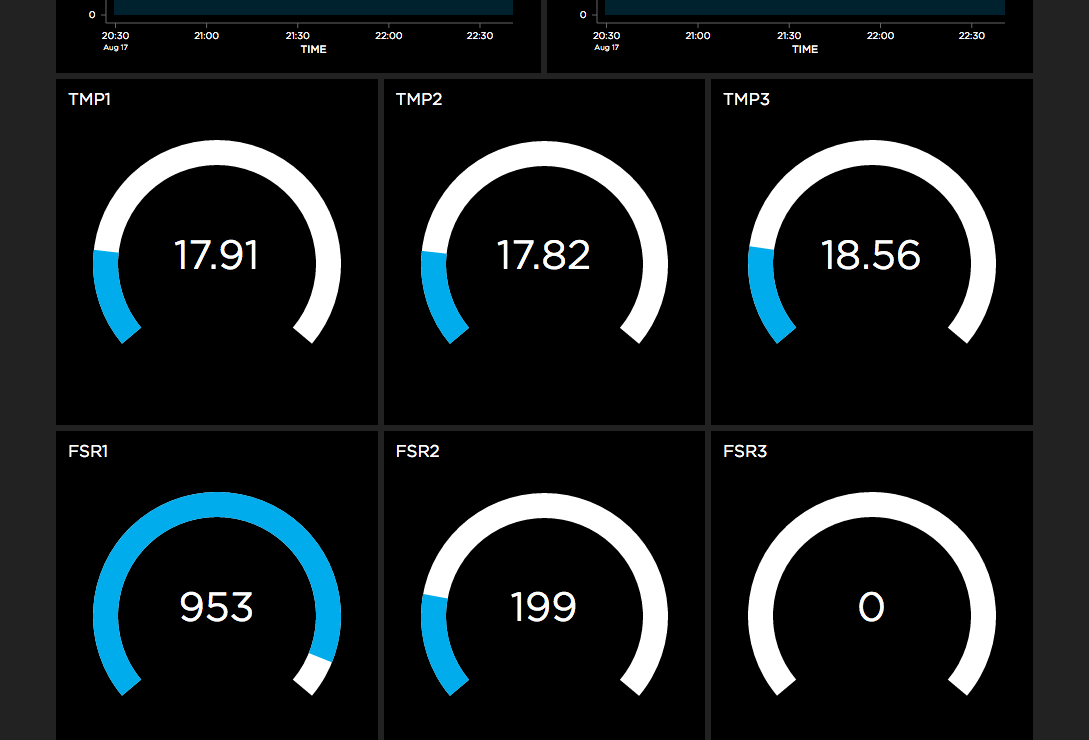
- 17-AUG: Using Adafruit IoT platform (Adafruit IO) and using their MQTT demo to send data from the Feather Huzzah to Adafruit IO (only publishing data from sensors), setting up pretty quick some feeds and a dashboard, connected DHT and 3 FSRs and 3 TMP36 sensors. Connected IFTTT to send a notification if the DHT temperature goes over a certain temperature.
In the end we changed the TMP36 analog sensors with DS18B20 digital sensors, which are working nicely, and are much easier to use for our use case.
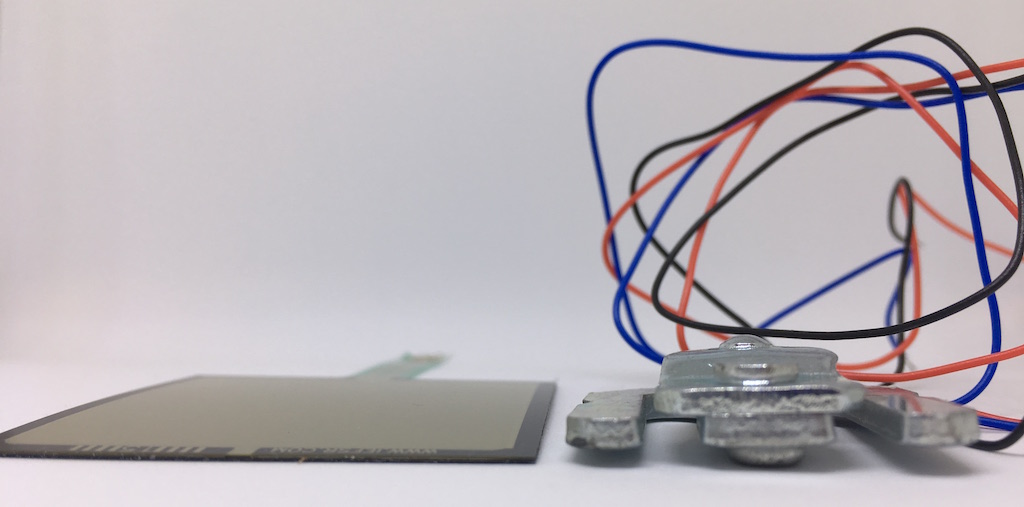
- 19-AUG: Bought a kitchen scale to have a look at what it uses for measuring weight (price of 150 DKK, uses 4 load cells and an amp)
We’ve written this blog post about what we found inside.
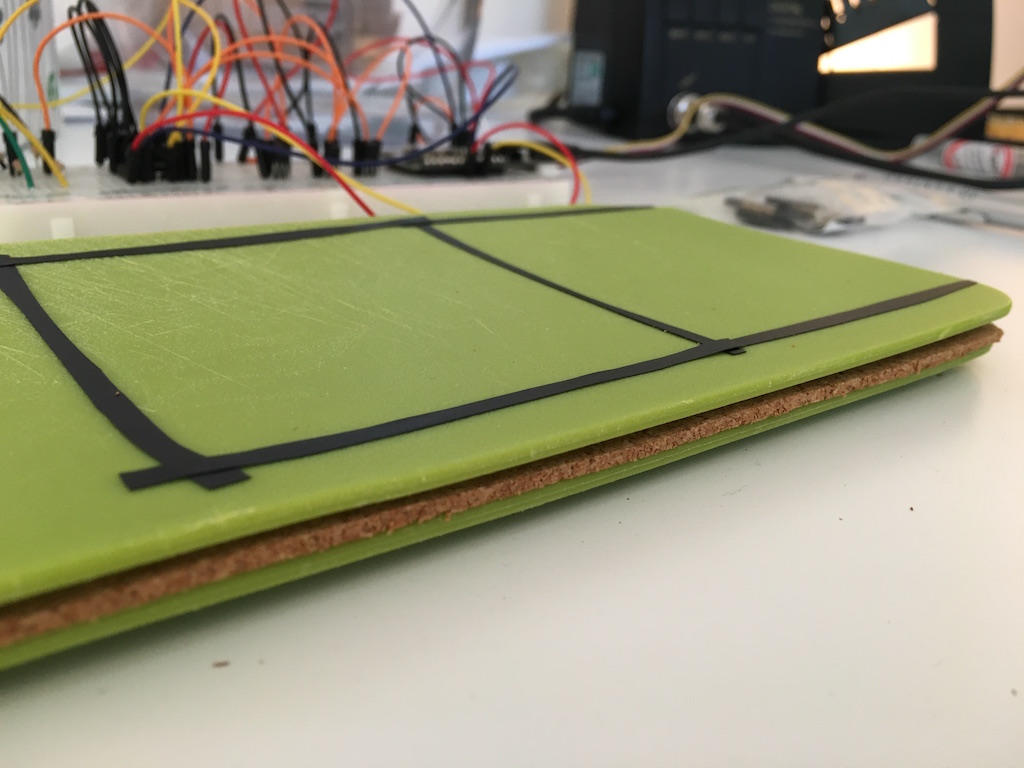
- 21-AUG: Worked on a surface where the FSRs could be mounted and then fitted in the fridge. Sandwiched the FSRs and tested the measurement with different materials on top and with different milk quantities. Designed and soldered a perfboard for feather, mux, resistors, and connections to the sensors. Replaced breadboard with soldered perfboard. Feather stays on battery.
We can fit 1 jug of water and 2 milk cartons in the fridge door, so we marked the location where these will be as guidance for where to place the FSRs.
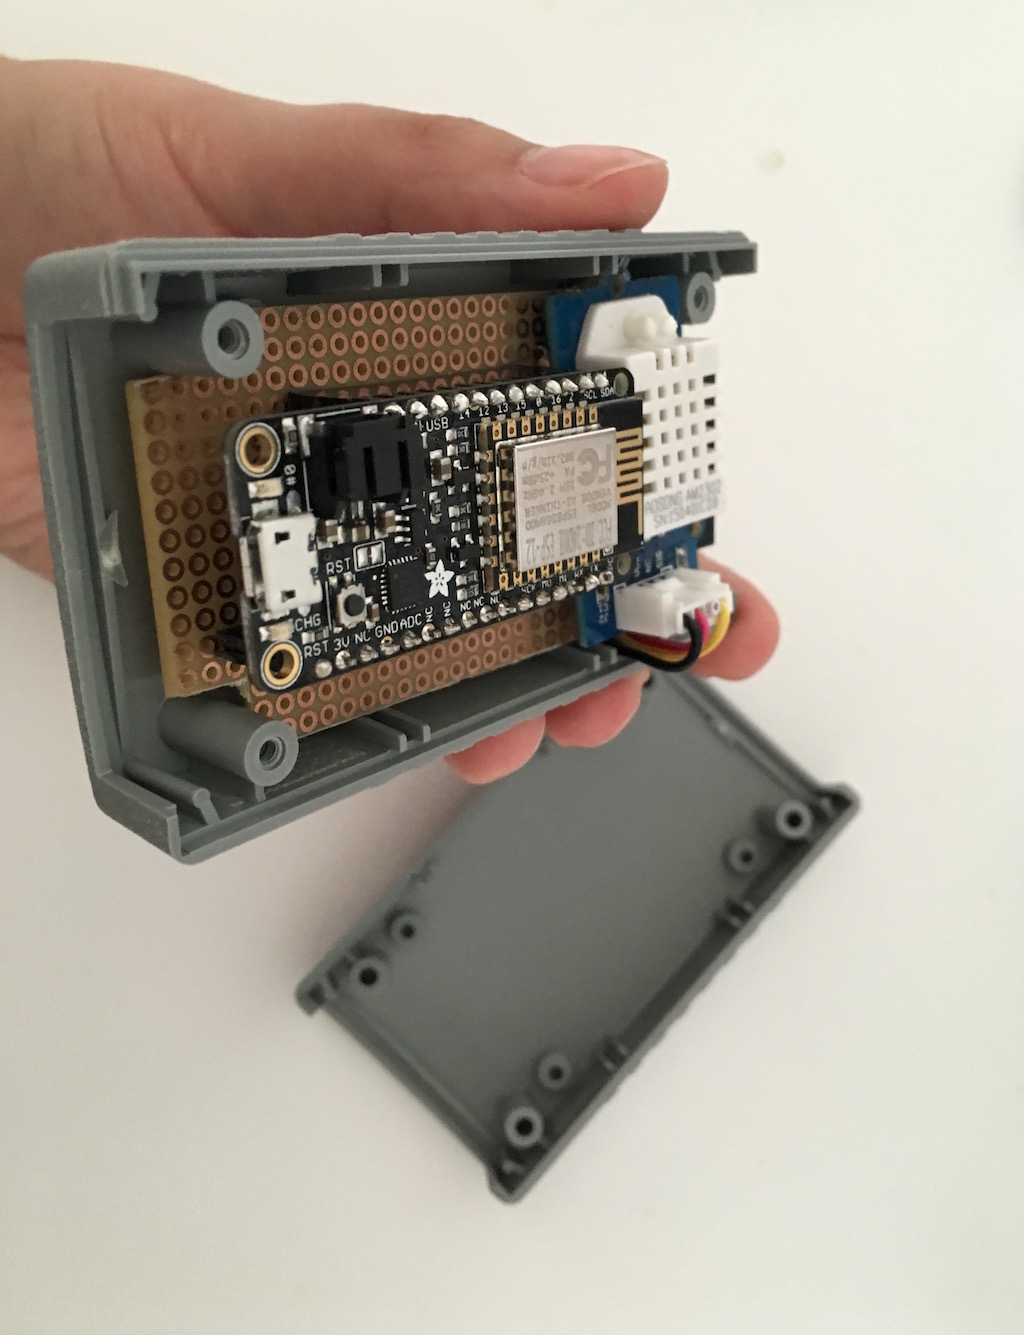
We fitted the perfboard into the smallest case we could find at our local electronics shop.
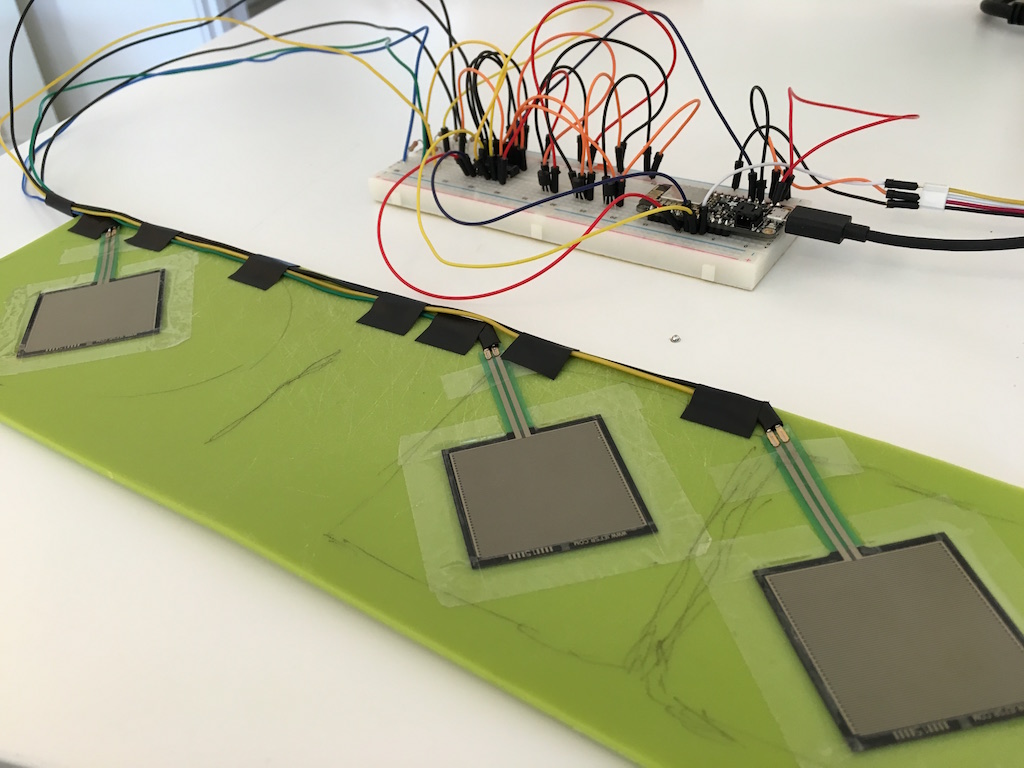
The result
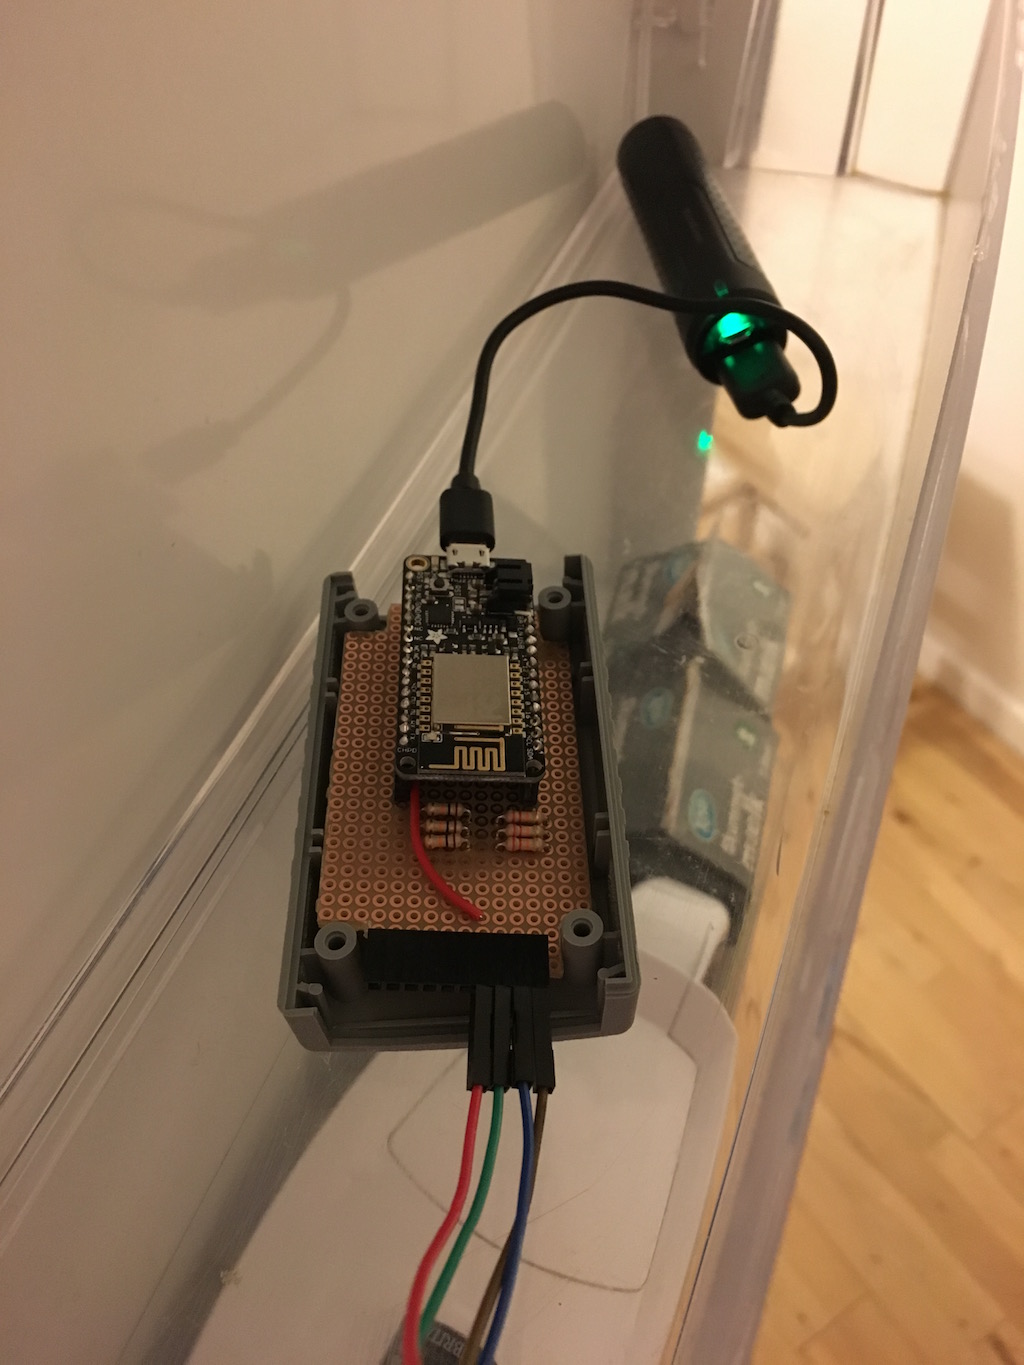
Here’s the result, with the 3 FSR sensors tightened in the green layer set on the bottom shelf of the fridge door, and connected to the Feather Huzzah that is sitting on the shelf above, powered by a battery. (There is room for improvement in terms of cable management.)
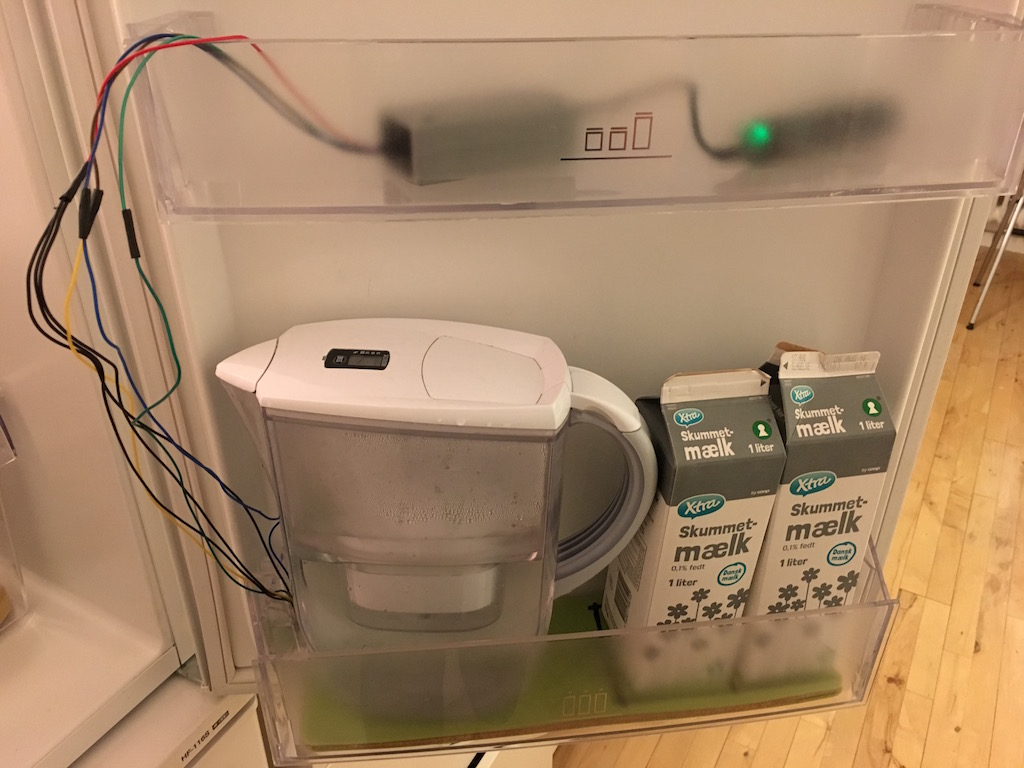
The Huzzah did not last long on the battery though. We don’t have exact figures, but with publishing data each 6-10 seconds to Adafruit IO it did not last longer than 24 hours. We ended up replacing the battery with a cable that goes out of the fridge into an electricity plug.
Lessons learned
The FSRs work better when we add some soft cushioning material like foam on the FSR surface in order to distribute the pressure on the sensor.
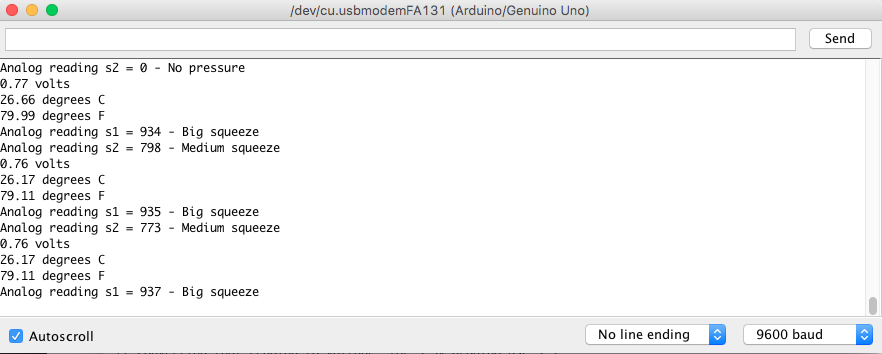
They are not accurate and sensors can differ between each other with around 10%. This means that for the task of finding how much milk is in the milk carton (from 0 to 1 liter) we require some calibration and threshold setting per sensor. The value for a full 1 liter milk carton is somewhere around 1001, while a half-full milk carton is somewhere in the area of 985, so it is difficult to directly translate these values into weights.
The FSRs are useful for projects where we need to detect presence and are not interested in the how much pressure is applied. So it is fine if we are interested only in knowing whether we have milk cartons or not.
However, we want to get more precise measurements, so next step would be to try building the milk scale with a load cell instead.
[UPDATE 30-OCT-2016]: Added YouTube video with a demo of the smart scale prototype: